
The second day of The Jamzu Daily Double on Touch Arcade featured a position that was a real mind-twister. The contest went into the third round, but Khamous nailed the right move for this twisted 6 position right after the third round began to take the day’s prize!
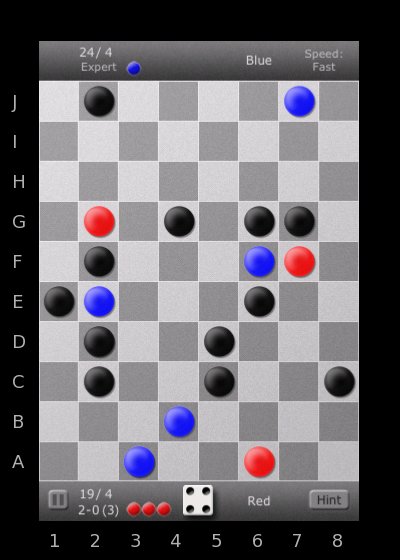
POSITION ONE Red to move with a four.
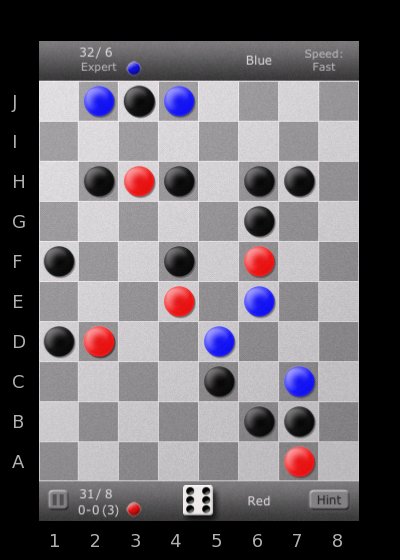
POSITION TWO Red to move with a six.
Once again, TheSporkWithin got the first correct move in the contest. Most everyone else was going for G7-C7 in the first position, but Spork got the right idea with G7-E7. After that, position one was a done deal.
But the second position was the real crazy one. Several players got very close with the moves H6-D6 and G6-A4. The best move was just enough out of sight to be overlooked. When I kicked off the third round, I dropped the big hint that the best move started with H6, and Khamous, who earlier in the contest was perplexed by the legality of H6-D6, came back with the winning twist: H6-D4.
It was a tense day’s contest in The Jamzu Daily Double series. Extremely challenging! But everyone is looking forward to the third round, Wednesday (tonight) at 9pm ET!
A $15 iTunes Gift Card will be given away to each day’s winner! New players can join at any time.
![]()
Cheers,
~Doug
—————–
Here’s the full analysis of Tuesday’s best moves:
Position One
Best Move: G7-E7
– Unblocks Red and maintains a block on Blue’s most vulnerable runner.
– Sets up Red in lane 7 for a nice move off with a roll of 4 or more.
– Takes the potential block G7-H2 away from Blue.
Other Move:
E6-A4
– Opens Blue up in lane 6 way too early. Yes, you block the Blue runner at B4, but if Blue runner F6 got off now, you’d lose all of your lead in the race, and then possibly leave the Red A6 runner a sitting duck for future blocks, including the reversable block at A4. Better to first move Red A6 runner forward a bit, and then try to block behind him with E6, G6 or E7.
Position Two
Best Move: H6-D4
– Unblocks Red and blocks Blue.
– Is a “one way block” that cannot be flipped back to block Red lane 6 runner again (at least not any time soon). Also much harder for Blue to ever use D4 to block Red’s lane 7 runner, and pointless for Blue to use D4 to block Red in lane 2, at least while his J2 runner is sill there.
– Blocks behind Red E4 runner, allowing Red to clear the jammers at H4 and F4 more safely.
Other Moves:
H2-B2
– Way too early to open the door to Blue’s lane 2 runner. Any high roll and J2 can just take off. And if Blue gets a 6, he’s gone with a jump! Better to move Red lane 2 runner ahead then try to block closer behind possibly with H2-F2, or with either of the H4 and F4 jammers.
H6-D6
– Does something similar to to best move H6-D4, but weaker.
– Blue can easily reverse the D6 block over to Red’s most vulnerable runner A7, blocking on E7.
– Blue could also flip a D6 block right back to Red on H6 again.
G6-A4
– Even more similar to best move H6-D4, but also even weaker than move H6-D6.
– Does not block Blue in lane 4 in an effective way.
– Can still be revesed right back to Red’s most vulnerable runner, this time on D7.
The overall strategy with H6-D4 is to first get the great block on D4, then immediately start unburying A7 by attacking Blue with the B7 jammer in lanes 4, 5 or 6. As soon as A7 is unburied, you could hope to make a run for it in lane 7. After getting lane 7 a bit forward, then you could go for an all out assault on blue in lanes 2 and 4, his weak spots.
Another possible alternative could be to maintain control in lane 6 by moving G6 next, and then hoping to make a run for it in lane 6. Then start with lane 7 immediately afterward, but I think I would lean toward getting lane 7 going next.
With a roll of 3, you could first take the chance to move D2 in tight, and then follow with one of the other strategies above.