POSITION TWO Red to move with a five.
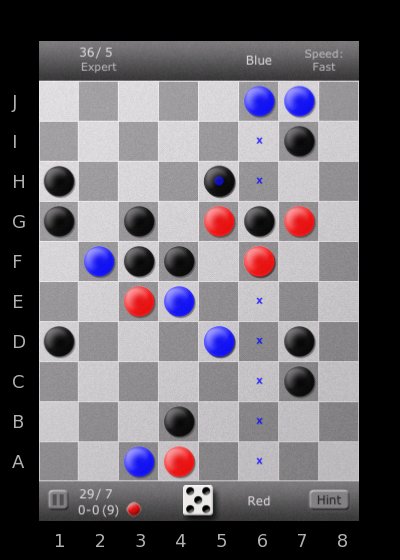
BEST MOVE: F4-E7 (Nobody got this one! 🙂 )
– Perfect time to begin unblocking Red’s most vulnerable runner while attacking Blue.
– While unblocking in a series of moves you can attack Blue at his most vulnerable runners in lanes 6 and 7.
– By unblocking with F4 first instead of B4, you are set up for a potential maximum long move when you do get B4 out of the way.
– Moving F4-E7 allows the jammer in G3 to be free to potentially block blue in lanes 5, 6 or 7 on a future turn.
– As part of the unblocking series of moves for lane 4, B4 jammer can also potentially be used to block in lanes 5, 6, or 7.
– F4-E7 is a “one way block.” It is impossible for Blue to flip that block back in front of Red on F4 again.
– Given the position, it will be also be nearly impossible for Blue to use the E7 jammer in the future to block Red anywhere else.
OTHER GOOD MOVES:
B4-C5 (Kevd, Ahiru)
– This move definitely has the right idea as in F4-E7, but the wrong jammer.
– It does stop Blue in lane 5.
– But if you unblock with B4 first, you give Blue an unnecessarily early chance to escape in lane 4, and you would more likely lose the chance to jump him there.
– This is really a quesion of timing. The F4 jammer should be moved first, then B4 in a following move.
F3-E2 (haffertee, Khamous, Ossamu, CzarCastic, cathy, TheSporkWithin)
– Does stop Blue from making a potential big advance in lane 2 on his next roll.
– Does unblock Red and block Blue.
– Does not unblock the more vulnerable runner.
– Using the F3 jammer at later point in game to attack blue in 5, 6 or 7 would be more effective.
– Blue can easily flip a block at E2 right back to Red in several places: Either at F3 again, or G4, C4 or even H5 when Red clears that block.
OK, I admit it, this postion was tough and tricky almost to the point of being sadistic. 🙂 Certainly the toughest one of the contest. Nobody mentioned it as a possible move in their analysis, so I’m thinking that no one even saw it! Definitely Kevd and Ahiru came the closest with B4-C5. They had the right idea.
The best move in this position is all about timing. Red has established a decent lead in squares, and now he can even the blocks and help his position by going for the kill with a strong attack on Blue in lanes 5, 6 and 7. If he hesitates with trying to free his runner in lane 4, he is leaving himself vulnerable for too long and missing a great opportunity.
F3-E2 is really a tempting mirage. Although it looks good to block Blue here, this is likely to be a very temporary gain, and could easily be used against Red later. Better to let Blue go here (if he gets a high roll) and concentrate on hurting him in lanes 5, 6 and 7 while helping yourself.