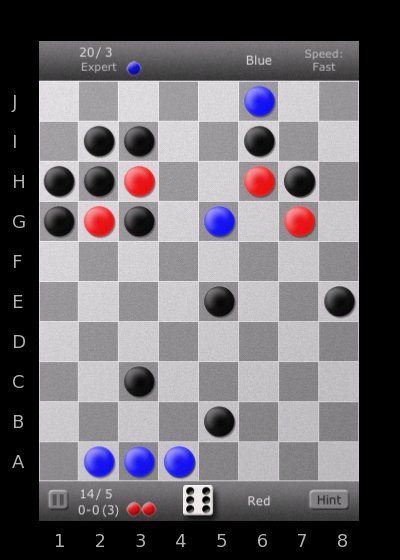
POSITION ONE Red to move with a six.
BEST MOVE: H7-F5 (Khamous, Kevd)
– Unblocks and controls lane 7 for a potential good runner move off.
– Adds a block to Blue in lane 5.
– Blue’s blocks in lane five cannot be flipped back to Red, especially if G7 runner is off.
– Red’s blocks in lane 2 and 3 can still be used in upcoming moves to attack Blue in lane 6.
– With H7 out of the way, Red also has the chance, with a roll of 4 or 5, to open lane 6 by swinging the I6 jammer around to block Blue on E6 or D5. This would almost certainly mean the end for Blue.
OTHER GOOD MOVES: I2-G6, I2-E6 (haffertee, Ossamu, CzarCastic, TheSporkWithin, Ahiru)
– This does unblock Red and block Blue.
– But does not provide an open lane if Red gets a high roll.
– If Red moves a jammer to G6, this block could easily be flipped by Blue to counterattack Red in lane 2, 3 or 7.
– A jammer at G6 decreases Red’s options for the jammer at H7.
– Of these two, I2-E6 is better.
This is one of the most challenging positions, partly because the best move may be difficult to see.
Red is ahead in the race both in squares and runners off, but behind in blocks. So we want to find something that will help Red in blocks. Both I2-G6 and H7-F5 help Red with blocks. H7-F5 however, allows you to control lane 7 for a good runner move, where otherwise Blue is certain to try and block using the jammer at I6 on any odd roll in the next move.
If G7 runner moves forward at least 3 or more on the next roll, that runner is either off or safe. If Blue tries to free himself by moving I6 out of the way, then H6 runner can easily move off also, strengthening Red’s lead.
With H7-F5, Red and Blue both have 4 blocks to deal with, but Red is overall better positioned to win the race and continue to counterattack.
Note: H7-D5 may be as good a move here as H7-F5, as this move may make it a bit harder to flip the block back to Red. But we see H7-F5 as the overall best.